# Set up the session
Now we're going to track our reference image for the first time! :sunglasses:
## Create the viewport
We begin by creating the viewport. Remember that the viewport is the area in which we'll display the augmented scene. Add the following to `index.html` and to `ar-demo.js`:
```html title="index.html" hl_lines="12"
encantar.js WebAR demo
```
```js title="ar-demo.js" hl_lines="17-19"
window.onload = async function()
{
try {
if(!AR.isSupported()) {
throw new Error(
'This device is not compatible with this AR experience.\n\n' +
'User agent: ' + navigator.userAgent
);
}
const tracker = AR.Tracker.Image();
await tracker.database.add([{
name: 'my-reference-image',
image: document.getElementById('my-reference-image')
}]);
const viewport = AR.Viewport({
container: document.getElementById('ar-viewport')
});
}
catch(error) {
alert(error.message);
}
};
```
## Create the source of data
Let's set up our source of data. We get the `HTMLVideoElement` corresponding to the test video and then we use it to instantiate a video source of data. Write the following to `ar-demo.js`:
```js title="ar-demo.js" hl_lines="21-22"
window.onload = async function()
{
try {
if(!AR.isSupported()) {
throw new Error(
'This device is not compatible with this AR experience.\n\n' +
'User agent: ' + navigator.userAgent
);
}
const tracker = AR.Tracker.Image();
await tracker.database.add([{
name: 'my-reference-image',
image: document.getElementById('my-reference-image')
}]);
const viewport = AR.Viewport({
container: document.getElementById('ar-viewport')
});
const video = document.getElementById('my-video');
const source = AR.Source.Video(video);
}
catch(error) {
alert(error.message);
}
};
```
## Start the session
The session is a central component of a WebAR experience. The `AR` namespace has a very special method called `startSession`. It receives a settings dictionary that lets us configure the new session in different ways. Add the following code to `ar-demo.js`:
```js title="ar-demo.js" hl_lines="24-31"
window.onload = async function()
{
try {
if(!AR.isSupported()) {
throw new Error(
'This device is not compatible with this AR experience.\n\n' +
'User agent: ' + navigator.userAgent
);
}
const tracker = AR.Tracker.Image();
await tracker.database.add([{
name: 'my-reference-image',
image: document.getElementById('my-reference-image')
}]);
const viewport = AR.Viewport({
container: document.getElementById('ar-viewport')
});
const video = document.getElementById('my-video');
const source = AR.Source.Video(video);
const session = await AR.startSession({
mode: 'immersive',
viewport: viewport,
trackers: [ tracker ],
sources: [ source ],
stats: true,
gizmos: true,
});
}
catch(error) {
alert(error.message);
}
};
```
Most of the settings passed to `startSession` correspond directly to the [concepts](./concepts.md) we saw earlier. We're starting a new session in immersive mode, with the tracker, source of data and viewport that we have just configured. Let me explain what `stats` and `gizmos` mean:
1. When you set `stats: true`, you're asking the engine to display a stats panel that shows useful data such as the current framerate. This is useful when developing WebAR experiences, but you should disable it in production.
2. The option `gizmos: true` enables the gizmos. Gizmos are visual artifacts that help you visualize the current state of the tracker. They too are useful in development. In production, you may disable them or enable them partially (more on that later).
Open { ._blank }. You should see the tracking in action. Even though there is no virtual scene yet, the gizmos will show you the image being tracked.
[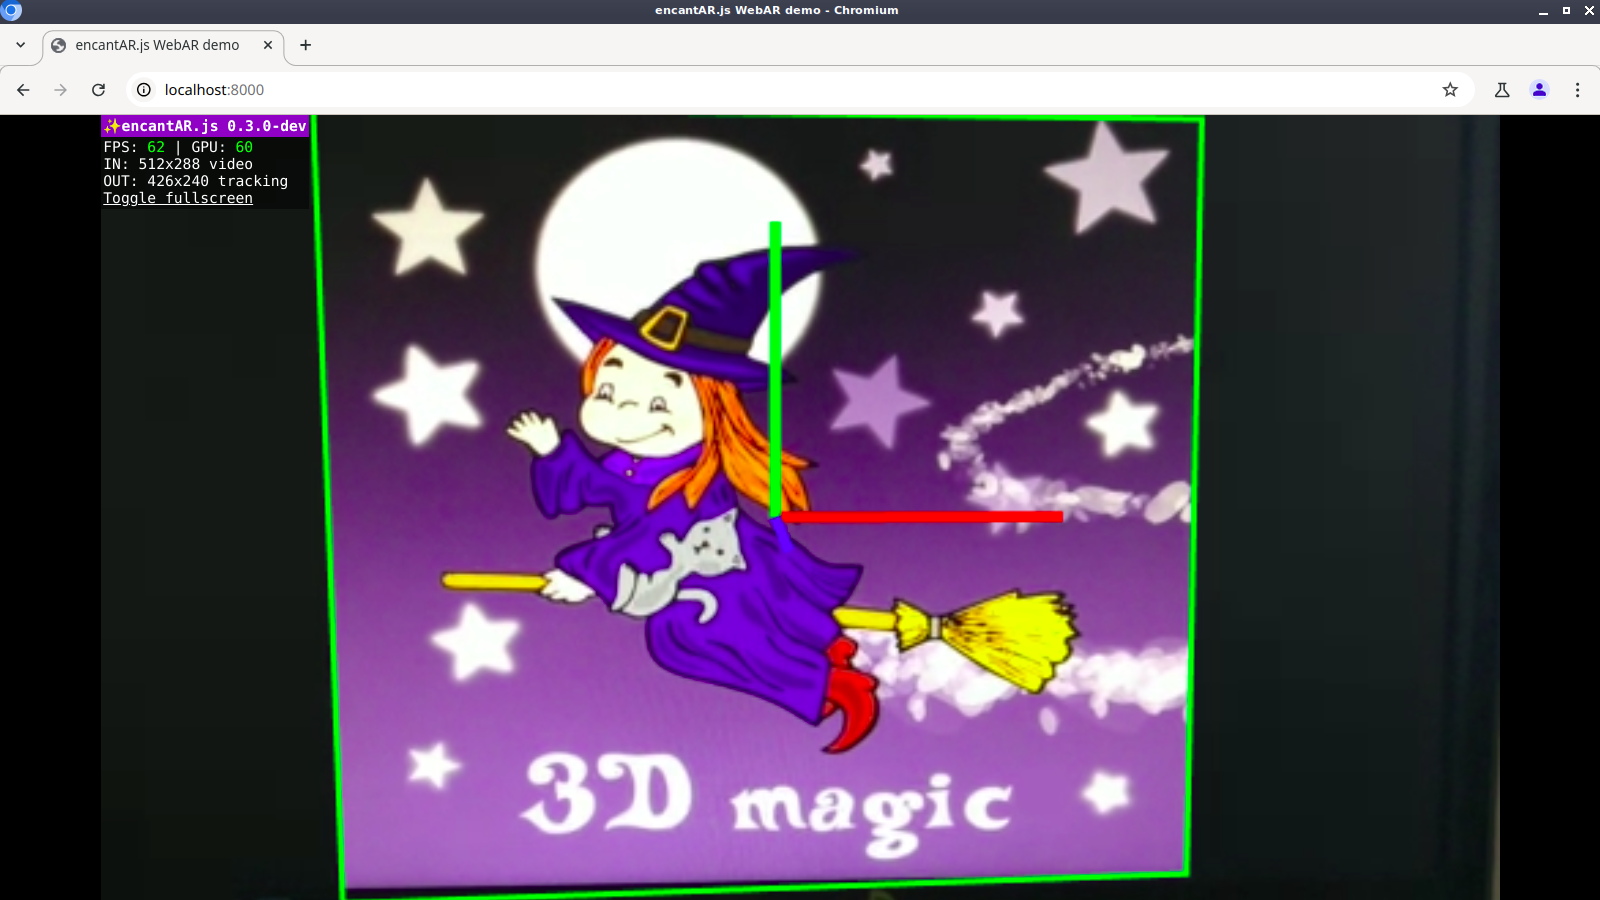](../img/image-tracking-gizmos.webp){ ._blank }
Image tracking in action!
The code I have just presented is, in essence, what you need to start a session. I'm going to move it to a new function called `startARSession` for convenience:
```js title="ar-demo.js" hl_lines="4 11-43"
window.onload = async function()
{
try {
const session = await startARSession();
}
catch(error) {
alert(error.message);
}
};
async function startARSession()
{
if(!AR.isSupported()) {
throw new Error(
'This device is not compatible with this AR experience.\n\n' +
'User agent: ' + navigator.userAgent
);
}
const tracker = AR.Tracker.Image();
await tracker.database.add([{
name: 'my-reference-image',
image: document.getElementById('my-reference-image')
}]);
const viewport = AR.Viewport({
container: document.getElementById('ar-viewport')
});
const video = document.getElementById('my-video');
const source = AR.Source.Video(video);
const session = await AR.startSession({
mode: 'immersive',
viewport: viewport,
trackers: [ tracker ],
sources: [ source ],
stats: true,
gizmos: true,
});
return session;
}
```
Now all you have to do to start a new session is call `startARSession()`!
## Start the animation loop
The animation loop repeatedly calls the user callback. The user callback is a function responsible for updating and rendering the virtual scene. We have no virtual scene at the moment, but we'll already set up that function. Let's call `session.requestAnimationFrame()` and pass the user callback as an argument:
```js title="ar-demo.js" hl_lines="6-11"
window.onload = async function()
{
try {
const session = await startARSession();
function animate(time, frame)
{
session.requestAnimationFrame(animate);
}
session.requestAnimationFrame(animate);
}
catch(error) {
alert(error.message);
}
};
async function startARSession()
{
// ...
}
```
Calling `session.requestAnimationFrame()` inside the user callback, `animate()` in this example, makes it loop until the session ends. Making that call outside the user callback starts the loop.
!!! info "requestAnimationFrame"
Note that `session.requestAnimationFrame()` is different from `window.requestAnimationFrame()`. The former is a call to the WebAR engine, whereas the latter is a standard call to the web browser.
 ```
```js title="ar-demo.js" hl_lines="17-19"
window.onload = async function()
{
try {
if(!AR.isSupported()) {
throw new Error(
'This device is not compatible with this AR experience.\n\n' +
'User agent: ' + navigator.userAgent
);
}
const tracker = AR.Tracker.Image();
await tracker.database.add([{
name: 'my-reference-image',
image: document.getElementById('my-reference-image')
}]);
const viewport = AR.Viewport({
container: document.getElementById('ar-viewport')
});
}
catch(error) {
alert(error.message);
}
};
```
## Create the source of data
Let's set up our source of data. We get the `HTMLVideoElement` corresponding to the test video and then we use it to instantiate a video source of data. Write the following to `ar-demo.js`:
```js title="ar-demo.js" hl_lines="21-22"
window.onload = async function()
{
try {
if(!AR.isSupported()) {
throw new Error(
'This device is not compatible with this AR experience.\n\n' +
'User agent: ' + navigator.userAgent
);
}
const tracker = AR.Tracker.Image();
await tracker.database.add([{
name: 'my-reference-image',
image: document.getElementById('my-reference-image')
}]);
const viewport = AR.Viewport({
container: document.getElementById('ar-viewport')
});
const video = document.getElementById('my-video');
const source = AR.Source.Video(video);
}
catch(error) {
alert(error.message);
}
};
```
## Start the session
The session is a central component of a WebAR experience. The `AR` namespace has a very special method called `startSession`. It receives a settings dictionary that lets us configure the new session in different ways. Add the following code to `ar-demo.js`:
```js title="ar-demo.js" hl_lines="24-31"
window.onload = async function()
{
try {
if(!AR.isSupported()) {
throw new Error(
'This device is not compatible with this AR experience.\n\n' +
'User agent: ' + navigator.userAgent
);
}
const tracker = AR.Tracker.Image();
await tracker.database.add([{
name: 'my-reference-image',
image: document.getElementById('my-reference-image')
}]);
const viewport = AR.Viewport({
container: document.getElementById('ar-viewport')
});
const video = document.getElementById('my-video');
const source = AR.Source.Video(video);
const session = await AR.startSession({
mode: 'immersive',
viewport: viewport,
trackers: [ tracker ],
sources: [ source ],
stats: true,
gizmos: true,
});
}
catch(error) {
alert(error.message);
}
};
```
Most of the settings passed to `startSession` correspond directly to the [concepts](./concepts.md) we saw earlier. We're starting a new session in immersive mode, with the tracker, source of data and viewport that we have just configured. Let me explain what `stats` and `gizmos` mean:
1. When you set `stats: true`, you're asking the engine to display a stats panel that shows useful data such as the current framerate. This is useful when developing WebAR experiences, but you should disable it in production.
2. The option `gizmos: true` enables the gizmos. Gizmos are visual artifacts that help you visualize the current state of the tracker. They too are useful in development. In production, you may disable them or enable them partially (more on that later).
Open
```
```js title="ar-demo.js" hl_lines="17-19"
window.onload = async function()
{
try {
if(!AR.isSupported()) {
throw new Error(
'This device is not compatible with this AR experience.\n\n' +
'User agent: ' + navigator.userAgent
);
}
const tracker = AR.Tracker.Image();
await tracker.database.add([{
name: 'my-reference-image',
image: document.getElementById('my-reference-image')
}]);
const viewport = AR.Viewport({
container: document.getElementById('ar-viewport')
});
}
catch(error) {
alert(error.message);
}
};
```
## Create the source of data
Let's set up our source of data. We get the `HTMLVideoElement` corresponding to the test video and then we use it to instantiate a video source of data. Write the following to `ar-demo.js`:
```js title="ar-demo.js" hl_lines="21-22"
window.onload = async function()
{
try {
if(!AR.isSupported()) {
throw new Error(
'This device is not compatible with this AR experience.\n\n' +
'User agent: ' + navigator.userAgent
);
}
const tracker = AR.Tracker.Image();
await tracker.database.add([{
name: 'my-reference-image',
image: document.getElementById('my-reference-image')
}]);
const viewport = AR.Viewport({
container: document.getElementById('ar-viewport')
});
const video = document.getElementById('my-video');
const source = AR.Source.Video(video);
}
catch(error) {
alert(error.message);
}
};
```
## Start the session
The session is a central component of a WebAR experience. The `AR` namespace has a very special method called `startSession`. It receives a settings dictionary that lets us configure the new session in different ways. Add the following code to `ar-demo.js`:
```js title="ar-demo.js" hl_lines="24-31"
window.onload = async function()
{
try {
if(!AR.isSupported()) {
throw new Error(
'This device is not compatible with this AR experience.\n\n' +
'User agent: ' + navigator.userAgent
);
}
const tracker = AR.Tracker.Image();
await tracker.database.add([{
name: 'my-reference-image',
image: document.getElementById('my-reference-image')
}]);
const viewport = AR.Viewport({
container: document.getElementById('ar-viewport')
});
const video = document.getElementById('my-video');
const source = AR.Source.Video(video);
const session = await AR.startSession({
mode: 'immersive',
viewport: viewport,
trackers: [ tracker ],
sources: [ source ],
stats: true,
gizmos: true,
});
}
catch(error) {
alert(error.message);
}
};
```
Most of the settings passed to `startSession` correspond directly to the [concepts](./concepts.md) we saw earlier. We're starting a new session in immersive mode, with the tracker, source of data and viewport that we have just configured. Let me explain what `stats` and `gizmos` mean:
1. When you set `stats: true`, you're asking the engine to display a stats panel that shows useful data such as the current framerate. This is useful when developing WebAR experiences, but you should disable it in production.
2. The option `gizmos: true` enables the gizmos. Gizmos are visual artifacts that help you visualize the current state of the tracker. They too are useful in development. In production, you may disable them or enable them partially (more on that later).
Open